Migration Guide
Why Migrate?
git is a near-ubiquitous version control system of choice for many software projects, but that doesn’t mean all projects need to be hosted the same way. In fact, git is itself designed to be service-independent. That doesn’t change the fact that it’s much easier to manage with a service - and many services offer features on top of git that make collaboration far easier - things like issue tracking, pull request management, documentation hosting, project management and continuous integration.
The platform we choose for hosting says a lot about the values of our ecosystem. Codeberg’s open-source roots and non-profit status help assure us that their interests are in the collaboration. Further, Codeberg’s tooling is moving toward federated interoperability which will make it even easier to work across services in the future.
When you migrate your projects you are helping to build enthusiasm and prove the viability for a more open platform for code development.
Migrating Step-by-step
Codeberg provides excellent documentation with instructions for migrating repositories. We’ll follow this closely. It is a great resource if you want more detailed instructions.
Step 1. Starting a Migration
On Codeberg, wherever you would start a new repository you will also find a nearby option to start a New Migration.
Start a New Migration and you’ll be greeted with a catalog of services to migrate from.
NoteAs the R ecosystem is largley based on GitHub, we’ll use that as an example, though the workflow would be largely the same regardless of service.
Step 2. Configuring the Migration
You’ll land on a platform-specific form where you are asked to provide basic information about the repository you plan to migrate from and be asked to provide credentials so that Codeberg can access the repo on your behalf.
You’ll be asked to provide:
The HTTP(S) git clone url (ie
https://github.com/org/repo.git)An access token
For simplicity, you can use GitHub’s “classic” Tokens, which are easier to set up, but grant sweeping access. We will delete it shortly after we’re done here to avoid any risks.Which parts of the repository you want to migrate. Unless you have reason to leave something behind, you might as well check all the boxes.
And a bit of information about the new repository you plan to migrate to: an owner, repository name, whether it should be private and an optional description.
Step 3. Migrate!
Click Migrate repository!
Once you start the migration you’ll land on a splash page to monitor the status. It should only take a couple minutes.
After the migration is complete, you should delete the access token that you created to perform the migration. we won’t need it again! If needed again you can always generate a new one.
Remember, you should also change your local git remote setup. If you have a clone on your local desktop (or any other computer) you can:
- 1
- Check to see your current remotes
- 2
-
Confirm that you added a new
origin
(Optional) Step 4. Mirroring Back to the Source Repository
Maybe you work with contributors who aren’t yet ready to migrate to Codeberg. Maybe you had a development package that people were installing using {remotes} or {pak} and you don’t want to break their installation process. Maybe you want to keep the visibility, knowing that GitHub still attracts a large user base?
We can work on Codeberg without sacrificing the benefits of GitHub by mirroring our repository back.
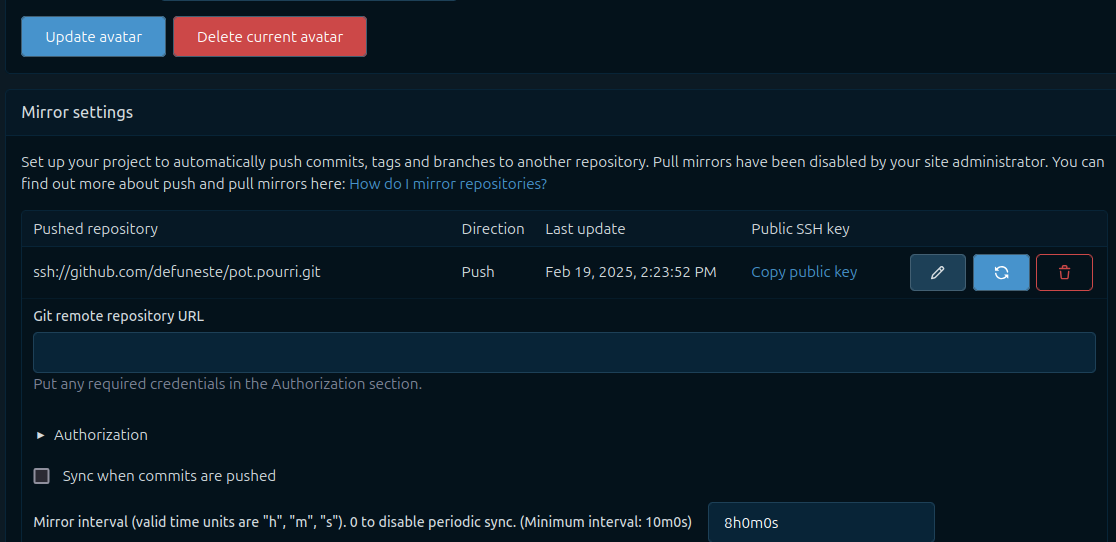
In your new codeberg repository settings, scroll down to find Mirror Settings
You’ll be asked for a
giturl and authentication. This should be eitherTip(Recommended) A SSH git clone url, provided with an authentication token.
or
WarningAn HTTP(S) git clone url, provided with your username and password
Even if you’re not comfortable with SSH generally, Codeberg will generate the key on your behalf. We only have to enter it in the right place on GitHub.
You can choose when the synchronizing happens. For most, it is a good idea to check the box for Sync when commits are pushed.
Click Add push mirror, at which point you’ll see a new entry in the mirrors listing.
If you used SSH authentication, you’ll be provided with a link to copy your public key.
Copy this public key and register it back on GitHub so Codeberg can act on your behalf to synchronize repositories. Give it a meaninful name so you remember it’s being used to manage your mirror.
(Optional) If you had GitHub actions configured, your mirror will still be executing those actions so long as their configuration files live in
.github/workflows. You can choose at this point whether you want to continue using GitHub actions by way of the mirror, or whether you’d prefer to migrate to Codeberg’s continuous integration tool, Woodpecker CI - or both! Even if you’re not paying for these services, remember that they’re consuming resources and generating emissions, so please be a mindful citizen of the global computing world and consume only what you need.
Next Steps
Add a Migration Notice
Whether you mirrored or left the old repository as is, you should let new visitors to your old repository know that it has moved. You should let your visitors know what they can expect regarding new issues and how you would like them to contribute.
If you left it as-is, you can edit the README.md.
If you mirrored your repository, you can tuck a GitHub-specific message in .github/README.md.
Update your Badges
If you had badges that reported the status of GitHub actions, those will continue to work so long as you have mirrored your repository back to GitHub and continue to run those actions.
However, if you choose to migrate to Woodpecker CI, it will automatically generate a pipeline status badge, which indicates an overall status for all workflows. You can find this badge in your repository’s CI settings on ci.codeberg.org.
Update your R Package GitHub Actions
Codeberg’s most accessible continuous integration services run on a system called Woodpecker CI, but it will require a few steps to configure.
Copy
r-pkg-standard.ymlinto your projects.woodpeckerdirectory. This will add a typical R package continuous integration setup, includingR CMD check- unit testing,
- code coverage calculation
pkgdowndocumentation building- Codeberg pages deployment
Head to
ci.codeberg.orgto enable Woodpecker CI for your new repository.(Optional) Enable deploying to Codeberg pages. Allowing Woodpecker CI to push changes back to the
pagesbranch, and thereby deploying to Codeberg pages, requires that we give Woodpecker CI a key to our repository. See the instructions at r-codeberg/woodpecker-ci#deploy for detailed instructions.